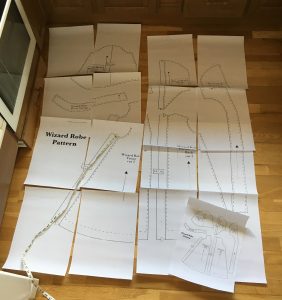
Jeg har lovet eldstemann en Harry Potter trollmannkappe. Jeg har forsåvidt lovet meg selv det samme… I sommer var vi på Stoff & Stil og kjøpte latterlige mengder svart stoff, og så strandet det hele litt, siden jeg ikke har fått forstørret mønsteret (som jeg fant på denne bloggen). Etter noen runder i kopimaskina hadde jeg et håp om at jeg nå nærmet meg såpass at jeg skulle klare å fikse det, så jeg forsøkte å legge det utover kjøkkengulvet i dag.
Vel.
Ser du det målebåndet? Den linja det ligger langs skal være 44 tommer, i følge mønsteret. Den er sånn ca akkurat 22 tommer. Så, atte, jeg antar jeg må finne en kopimaskin igjen og ta to runder til. Hvor jeg skal ha plass til å legge mønsteret utover når det er gjort er et åpent spørsmål, men vi får vel til noe…
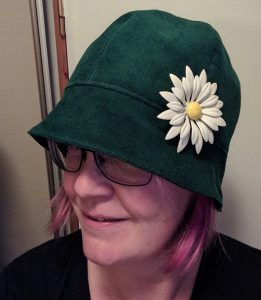
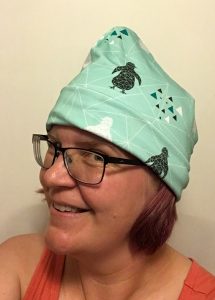
Etter å ha justert mønsteret til Elsewhen så hatten skulle bli stor nok, satt jeg i gang med det stoffet jeg egentlig hadde tenkt å bruke, en sjøgrønn smalstripet cordfløyel kjøpt på Stoff & Stil (med bukser i tankene, tror jeg) for noen år siden. Instruksjonene var detaljerte og enkle å følge og snart hadde jeg en ferdig hatt.
Nå er spørsmålet hvordan den skal dekoreres. Jeg er heller egentlig mot å holde meg til prestekragebrosjen, som er “vintage”, kjøpt på Etsy for flere år siden. Den må i så fall sys fast, for nålefestet er mildt sagt slarkete.
Skal jeg sy flere hatter etter dette mønsteret ville jeg droppet det indre hattebåndet og heller sydd foret i for hånd etter å ha sydd på bremmen. Alle de andre sømmene er veldig ryddige (så lenge man syr rett), mens akkurat den delen ser mer rotete ut. Det er jo inni hatten, så ikke noe noen andre vil se, men det irriterer meg likevel, og hadde vært så lett å fikse (men jeg gidder ikke sprette opp, det har en tendens til ikke å bli så pent det heller.
Fun fact: Om jeg hadde vært gutt hadde jeg hett Jørgen. Oldemor, min farfars mor, var fortsatt i live når jeg ble født, og hun het Jørgine. Mamma og pappa synes det var i overkant gammeldags som jentenavn (og jeg kan vel si meg enig), men at Jørgen var ok som guttenavn, så hadde planer om å kalle opp en eventuell sønn. Nå ankom jeg i stedet, så da ble det Ragnhild, men navnet Jørgen Hattemaker virker relevant til dagens tema.
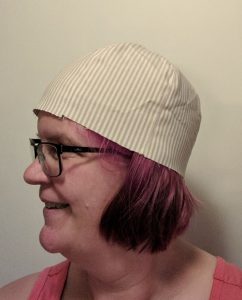
Siden det er en kjennsgjerning at cellegift medfører hårtap og det også er en kjennsgjerning at jeg ser null poeng i å benytte meg av muligheten til å få parykk på NAVs regning har jeg kikket meg om etter egnede hodeplagg de siste par ukene. Jeg har funnet et par kule tørkler, men ellers er det dårlig med voksenstørrelser av luer og hatter som egner seg innendørs. Så hva er da mer naturlig enn å børste støv av symaskina? Tid har jeg jo også plutselig godt med…
Første tanke var enkle bomullsluer av stretch-typen. “Beanie hat” som det heter. Jeg var innom Klar, ferdig – sy! på lørdag og kjøpte et par stykker restestoff av typen tynn bomullsstretch. Og så var det bare å Google mønster. Jeg vurderte å kjøpe et fra en eller annen Etsy-butikk, men så fant jeg dette innlegget på Melly Sews, og tenkte at det så da ganske rett frem ut. Så jeg satt meg ned med målebånd og papir og tegnet mønster.
Jeg er glad i å ta i litt på sømmonn og slikt, ut fra filosofien at det er bedre at noe er for stort enn for lite. Så den første lua ble litt stor.
Feilen med denne typen mønster er at det er grenser for hvor mye man kan redde seg inn når man først har klippet, så selv etter litt krymping er lua godt og vel stor nok, men absolutt brukbar.
Jeg tegnet ny versjon av mønsteret, litt mindre i alle retninger, og sydde en variant i et annet stoff. Den ble bedre, men fortsatt mer romslig enn jeg egentlig synes er nødvendig (særlig med tanke på at jeg jo altså ikke kommer til å ha alt det tjukke håret under der om noen uker). Så nå har jeg tegnet en tredje versjon, så får vi se. Jeg kommer tilbake med resultat.
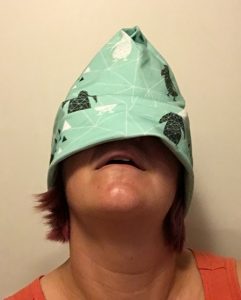
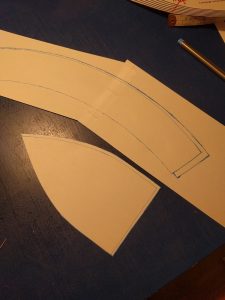
Men jeg gir meg ikke med sånne enkle greier, må vite. Jeg søkte litt på hattebutikker, siden rekvisisjonen til NAV kan dekke hodeplagg i stedet for parykk og jeg tenkte at en fjong liten cloche eller noe hadde vært en idé. Men når man er tjukk i hue er det nok desverre sånn at one-size-fits-none, og en one size som skal sitte bra fra størrelse 55-57 lover dårlig for ei som bruker størrelse 60. Så off we go to Google, og der finner vi både det ene og det andre. Først har jeg tenkt å prøve meg på Elsewhen-mønsteret, og siden jeg har lært (både av beanie-testingen og tidligere erfaring) fant jeg ut at jeg denne gangen skulle sy en testversjon, selv om mønsteret går fra 19 til 25 tommer, og 25 tommer burde være stort nok. Det viste seg å være lurt, for den ble definitivt i trangeste laget.
Det vil si, denne hattepullen passer forsåvidt utmerket, men siden det skal både avstiving og for inni her, og mønsterinstruksjonen spesifikt påpeker at hatten på dette stadiet (uten for) skal være ca en tomme for vid, er det åpenbart at jeg må justere. Heldigvis er det ikke verdens mest kompliserte mønster, og siden det allerede var flere størrelser på skjemaet var det lett å se hvor ting måtte justeres for å øke opp til neste størrelse.
Så nå er jeg utstyrt med et mønster som bør passe, og i dag har jeg kjøpt tråd som passer til stoffet jeg hadde tenkt å bruke, så da blir det hattemaking.
The Hello Kitty was the lass’ idea… The pattern is from another Ottobre (I’ll check the issues and update). I didn’t want to “waste” the happy camper fabric on a lining which was not meant to show, so I used a scrap of blue organic cotton. The button is from stash (aquired in a big lot of buttons at a flea market). I must say I’m pretty pleased, I even managed to figure out the whole issue of the fly – something I’ve never sewn from scratch before. The instructions in Ottobre are pretty good, on the whole, though, so I will not claim any unreasonable honour from that.
I made one alteration to the pattern, since I cut it rather big (hoping it will last a while): I added button hole elastic in the waistband with buttons (again from that flea market stash) to enable adjusting it. A good thing I did, too, as it’s waaaaay too wide as is, but looks pretty good once tightened a bit.
No, I’m not dead, I’ve just been pregnant. I realise this may not really be a hindrance to blogging, but it seems it was for me. As of four days ago I am a mother of two, the kid has a little sister and we’re all doing well. And that’s pretty much all I have to say about that here on the blog.
Indirectly, another baby may well influence the contents of blog posts, though, as with the main purpose of this entry which is to show off a bit of sewing.
Every time I sit down to sew after a prolonged break, I curse myself for having forgotten just how relaxing and rejuvenating I find the activity. A few years ago I managed to attend a couple of whole day “workshops” where a few people from the forum at tettinntil.no met up just to work on our own sewing projects for a whole day. I remember at that time pointing out to the husband that that sort of day – to me – is better than a spa break.
Anyway, some weeks ago I succumbed to sound medical advice and let the doctors write me off sick, and suddenly – well, after a week or so of doing basically nothing – I had energy enough to actually start preparing for the baby’s arrival. One thing I realised we’d need was some sort of middling warm outer wear, as the clothes we have from the kid are all meant for mid-winter temperatures, which are unlikely to manifest i September and October (I hope!). So I had a look through a stack of Ottobre magazines and found a pattern I liked, went off to Stoff og stil to find some suitable material, and got to work. Here is the result, sans model:
I adore both fabrics, and am rather pleased that I purchased a bit more than required for this pattern. I’ve already made a skirt in the striped babycord, and am contemplating sewing a Mei Tai with both fabrics in the panel somehow, I just need to check that I have something suitable for the straps in an appropriate colour.
I’ve almost done December Daily for two years now. This year I think I may actually do it, since I’ve started putting a foundation together, which is much further than I’ve ever gotten before. I’m trying to mostly use stash I already have.
I’m a Journal Your Christmas alumni, so I’ll be getting prompts all though December, which is useful. I never actually DID the journalling, but I purchased the class in 2009, so now I get the prompts every year. Isn’t that nice? I’m thinking it will be possible to use ideas from that for the days when there’s little or nothing worth documenting happening (and since we both work full-time I know there will be days where all we have time for is the bare neccessities to get us through the day – I’ll document at least one day like that, but it might get repetitive if every weekday Monday to Friday goes: “Had breakfast, went to work, worked, went home, had dinner, put the lass to bed, zonked out on the couch, went to bed”). Shimelle’s prompts are great and though they are meant for scrapbookers you could also just use any old notebook and write, if that’s what you want. The focus is on telling the story, and not just of THIS Christmas, but of your childhood Christmasses and any other stories you want to tell. The class is highly recommended.
So far what I’ve assembled is an album, purchased with the intention of doing a Week in the Life, and never used for that purpose. I still want to do Week in the Life, but December is soon here, and the album is red. So there. It’s a We R Memory Keepers three ring album for 8,5×11 page protectors. I had a few page proectors to fit, but I’ve put in an order for some more, one of the purchases it’s hard to get around.
Oh, and the album
I’ve also purchased Ali’s overlays and templates. The latter are really great, and I can see myself playing around with them and using them for other projects, too (I tend to resize and otherwise modify templates all the time). Since my pages are going to be rather larger than Ali’s 6×8,5 I had to resize the overlays, but they came out fine. With a little trial and error I settled on resizing to 8×11, which alters the overlay’s proportions slightly, but not so much as to be noticeable. As our printer tends to default to A4 rather than Letter, this meant I could print with the minimum amount of adjustment. I also recoloured to a darkish red. I managed to make do with the cardstock I already had by mixing in some offwhite with the whites (pale gray, pale beige and pale purple).
The printed pages
I’ve also gone through my stash and found some things that might serve as embellishments.
I had two packs of the journal tags, the contents of one pack in the front, the others are still in their packaging.Letter stickers. Always handy.Chipboard
I’ve got a lot more chipboard letters, though not much of it is in the correct colours. The “winter” and “frosty” are from a lot I purchased off a member of scrapping.no a while back, so I have no idea where they’re from, but they are perfect. Well, except for the colour, but the nice thing about chipboard is it’s easy to paint.
Stuff. Might use some of this, might not.
I also dug out some patterned papers and picked out the ones that were both Christmassy and that fit the colour scheme.
Five papers.
From left: Taylor “Ever Green” and Show-Offs “Deck the halls” from Daisy D’s, Fruitcake “Berry Branch” and “Snowed In” from Basic Gray and Holiday Collection “Alpine Snow Lace” from KI Memories. The Basic Gray ones have a near solid colour matching back, I might use those for some days. I’ve since cut strips to fit the bottom rectangle of the overlays from these, I’ll pick whichever goes with my pictures and other embellishments on the specific days.
I’ve got some stuff coming from Bananafish that will definitely be used, too. I purchased some supplies for Project Life from her just after the summer and fell head over heels in love with the wonderful little bits and pieces when they arrived, so I ordered more, including some Christmassy items, which will come in handy.
I really love what Ali is doing with the Hambly transparencies, but I think I’ll make do with making my own somehow (I’ve got some nice thick ones meant for laser copiers). I also like the baseball card size page protectors used to hold stars and other little embellishments, and since I have few of these I may be doing something similar. We’ll see.
Jeg sikler til stadighet (altså, ikke bokstavelig, da, det ville være uhygenisk) over putene til Putegeriljaen. Hva med deg? Enten du som meg har siklet lenge eller dette er første gang du ser putene har du nå TO sjanser til å vinne en pute. Eventuelt en sjanse til å vinne TO puter, dersom du har griseflaks.
I’ve blogged about our bookshelves on the bookblog. It sort of fits in with the series on “how the apartment is coming along”, but since it’s mostly book-related I put it over there.
I realise when looking at the pictures that even if we were able to live like minimalists in all other ways (not likely) our flat would never look minimalist with all those books. And there’s no way we’re covering them up. Or, even worse, making them look minimalist by turning them around. Yes, people actually do this (via). The mind boggles.
I’ve taken pictures of these squares before, but I seem not to have blogged them. Anyway, I’ve mounted a blanket, and started on edging, but ran out of yarn.
Edging started
It’s annoying, because I first bought this yarn at Panduro in Charlottenberg, figuring I could always get more later as there are Panduro outlets in Trondheim and Oslo. However, it turns out that none of the other outlets actually stock this – it’s organic cotton. I’ve already had to buy more, and the first attempt to get it from the webshop was only partly successful, as they – in their wisdom – do not refer to the colour codes printed on the yarn tags, just to names. So I ended up with the wrong shade of white in that first order. Shortly after, I had the chance to stop by at Charlottenberg again, and stocked up on white, so I could finish the squares. I was hoping I had just enough left now to finish one round of edging in each colour, but alas.
So it’s sitting on a shelf in the office waiting for me to either order more from the webshop or stop by Charlottenberg again – a possibility in July. We’ll see.
This desk has been in my parents’ house for ages. It used to be in the dining room while we lived in Hamar, and lately my father has been using it for his laptop when working at home. I remember that we got it from someone in the family way back when, but I can’t remember who, or why, or exactly when that was. I need to get some details from my father, I guess.
However, it is old enough. The colour is rendered pretty accurately in these pictures. It’s not really practical, which is why my father didn’t want it anymore. I don’t really have any plans for using it yet. In fact, I was all set to store it in the basement for the time being, when the husband suggested we might as well have it upstairs.
Detail of frontOne drawer has a fake lock, the rest are real.Inside drawers
So. It’s not practical. The ground colour is – well – hideous. And I can’t really paint it, since I want to keep the rosemaling, even if it’s (probably) not the most impressive example. Still, it’s got history and it holds memories for me personally. It stays.
Desk open
Note the yellow poster, by the way. My mom left a few bits and bobs in one of the drawers, mainly scrap paper and such, thinking the lass and I might find use for it in crafting projects. Among them was this poster. It says: “Not ready for cleaning.” I threatened to get it laminated and hang it on the front door any time my mother or my mother-in-law comes to visit…
To fit the writing desk, we had to move a tall chest of drawers (which were not meant to stay in this room anyway), and there was suddenly space to hang my type case. I found another one recently, which turned out to be perfect for displaying regular size minifigs, but not so good for the Toy Story characters I recently aquired.
They fit nicely in here, though.See where the type is still marked on the case?
Which gave me the idea that perhaps this desk would be the perfect Lego-building site. We’ll see.